Saturday, August 30, 2014

Shabby Hearts

Hello everyone!

I am sharing with you all today my shabby hearts another DT Project for Craftsupplies1! :) I love how these turned out....even though it felt like I didn't know what I was doing...lol!


Here is a picture of them hanging together....I used some fabric that I have had in my stash forever and cut some hearts out and sewed and stuffed them. I used some Craftsupplies1 goodies such as the laces and trims, appliques, flowers, charms, and bead caps. I made them to kinda tear down from one another and I think it turned out cute!


Here is a picture of them separated....I also used some tickets from Tim Holtz and made them into little tags with fabric sewed behind them. 


Here is the first one on the top...I used them same fabric on the front and back and here you can see the trim and lace that I used and also a flower applique and stickpin I made using the flower bead caps from Craftsupplies1.


Here is the purple one I made it is the second one down...not the greatest pic but I was trying to take it while it was hanging...I used a doily on this one and stuck it behind the wood word LOVE, and there is also a ribbon and porcelain rose and some organza and pearl trim from Craftsupplies1 as well.


Here is the third one I made and it's the bottom heart of the hanging. There is a charm, lace that isn't pictured very well here, and also a flower applique and a paper flower from Craftsupplies1.


And here is the last one that I made it kinda hangs to the left and bottom of the top heart. I did all the flowers in a different color scheme. So obviously this one is a light peach, I also added a little bit of brown to it with some flowers and the tag. The flowers and trims you see are from Craftsupplies1. The wood words and shapes are from Prima...my fav! 

As always here are the links to the stores and there is also a BOGO sale on the Parchment Paper Flowers still going on:

There is also a GDT position coming open...check out my video below for more info:

Here you will find all the details on the shabby hearts!!


Thanks for taking the time to stop by!!! Comments and questions are always appreciated!!


Wednesday, August 20, 2014

Shabby Altered Mason Jars

Hello everyone!!

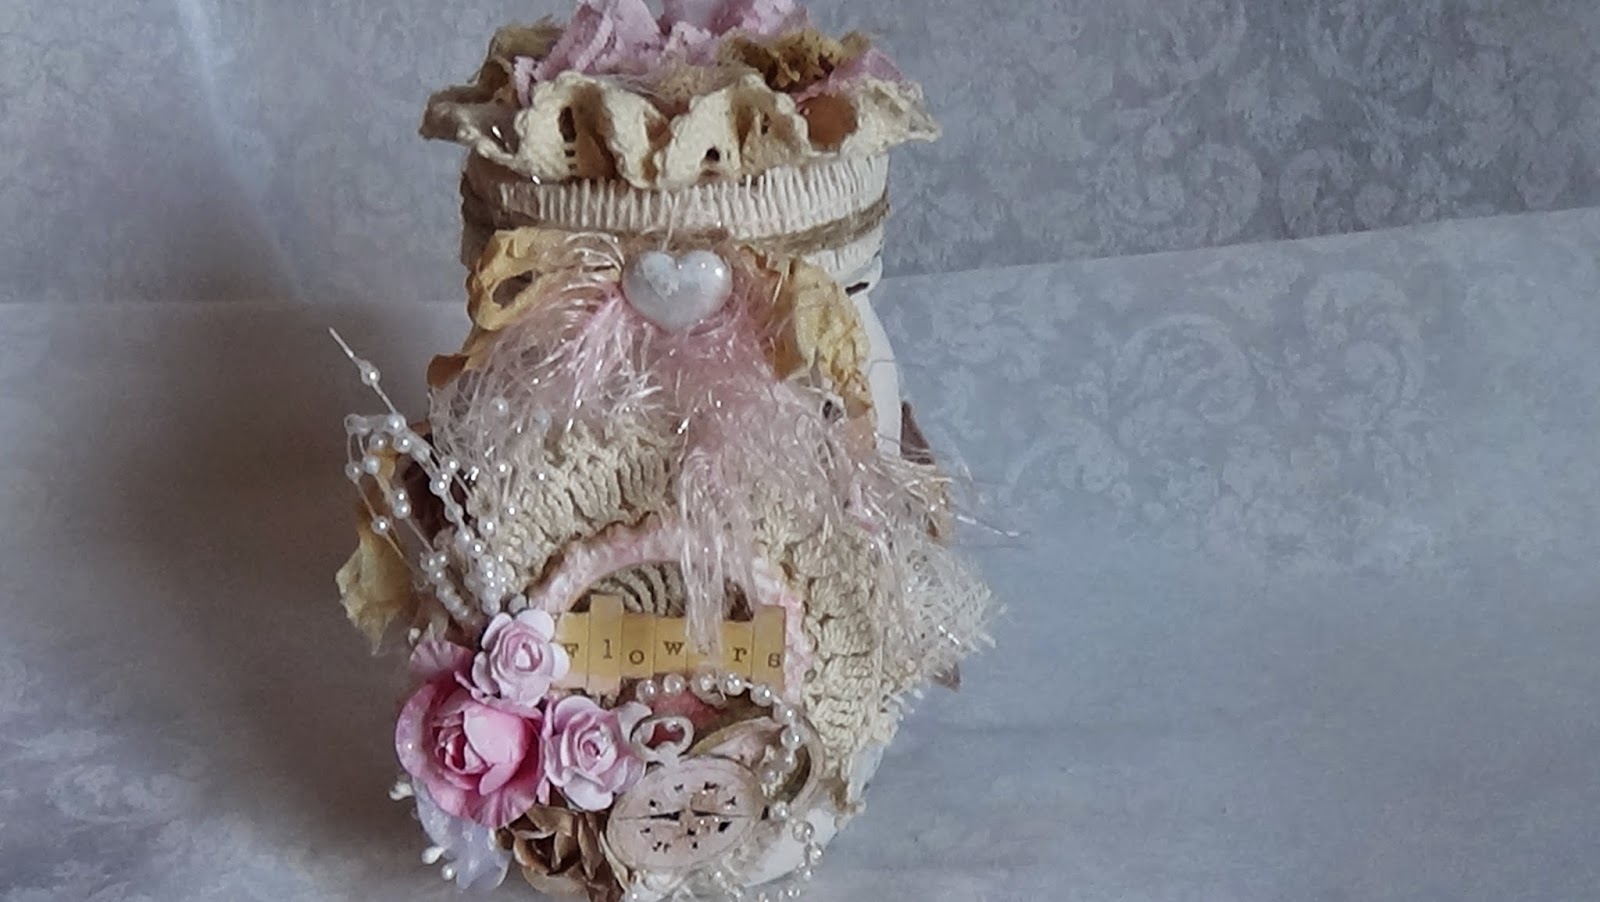
I am so excited to share with you my altered mason jars. I absolutely love how shabby they turned out!! They are a design team project for Craftsupplies1 so I used a ton of goodies from Julie's store. 

Here is a picture with both of the mason jars together...


So shabby cute!!  


Let me start with this one...I first started with some white spray paint then I used some of my acrylic paint in white and parchment and mixed them together with some sand to give them some texture. Then I took my Spun Sugar distress paint and lightly when over it to give it a pink hue...then I took a sanding pad and distressed it in areas..love how it turned out :) I also wrapped this one in some wide lace from Craftsupplies1 and then with a Recollections trim.


Here is the front with the flower cluster...I toke a square of muslin and added cheese cloth and a doily from Craftsupplies1 and glued it down then added my frame and alphas and tiny wood clock from Prima. I then added all the flowers you see from Craftsupplies1. The top of the jar is wrapped in more muslin and jute twine. Then on the very top I added a handmade flower using lace and trims from Craftsupplies1 as well. (Pictured Below)


Here is the other one.....

I did all the same things as I did on the first one....I wrapped in the wide lace but this time I also used Jute twine. 


Here is the picture of the front on this one....I used a square of Muslin again and cheesecloth and a doily. Then I used another one of my resin frames from the Martha Stewart mold and some alphas I have had forever. This flower cluster I also included a handmade flower I got from one of my friends Becky Long. It's pretty much the same idea as the first one. 


And here is the picture of the top of the jar with my handmade flower. I love how these turned out!!

Craftsupplies1 is also having a BOGO sale on Parchment Paper flowers. When you buy one you get one free Julie automatically includes it in your order...no coupon code needed. 

Click on the link below to visit her shops:

Also check out my video over on my YouTube channel where I explain all the details and you can get and up-close view of the jars :)


Thank you so much for taking the time to stop by!! Comments and questions are much appreciated and always welcome!!

Friday, August 15, 2014

My First Design Team Project for Nani ke Ola

Hello everyone!

I just wanted to do a quick share of the projects I made for Nani ke Ola's design team. :) I think they turned out GREAT! I was a little nervous because it was my first projects but hopefully that will settle down and my work will be able to shine through...lol!


Here is my altered paintbrush featuring the Domestic Goddess papers by 7 Dots Studio. I am calling it "Bold and Beautiful". I did an image transfer with the paper on the handle of the brush...I think it turned out pretty cool!! I also have a start to finish video on this brush over on my YouTube channel:


Last but not least......hehe!


Here is a little box that I also made using the same paper line. I am calling it "Always Creative" I really like this one and how it turned out!! 

I also have a video on this describing all the details on my YouTube channel:


If you want to know more details head on over to the Nani ke Ola blog where you can see more pics and a list of products used.

Also Nani ke Ola has a YouTube channel...yep and you can find my videos there too along with inspiring projects and details on products that are in the store..while your there hit subscribe :)

Thanks for stopping by!! :)


Monday, August 4, 2014

Craftsupplies1 YouTube Hop!! Come Join in the fun :)

Hello everyone!!

I just wanted to share with you today the prizes that I made for the Craftsupplies1 YouTube Hop! If you have never done a YouTube hop before...it's really easy to enter, just watch everyone in the Craftsupplies1 DT video..subscribe and leave a comment on each channel. You would be entered to win each DT members prize and also there are two Grand Prizes of $40 to Craftsupplies1!!!

Ok so here is what I made to give away....


Aren't they just beautiful!! I altered a frame, balsa box, and made a card.  I used a lot of Craftsupplies1 goodies, laces and trims, flowers, doilies, and acrylic sprays.


Here is the frame by itself...it is a Micheals Dollar Frame and I used Prima Lyric on it with some Guava and Gold Gelatos and also some gesso on the paper. I also ran the paper that is around the boarder  of the frame through my embosser which gave it a really cool texture! I also handmade the big flower and sprayed it with my Lindy's. The bow is made out of lace from Craftsupplies1 :)


Here is the altered balsa box I made. I made it into a camera by following a tutorial by Scrapinology on YouTube. They are a lot of fun to make. You can alter them into any style you like and this one I went with Shabby Chic to match my frame. 


And here is my card...using the same paper I altered an envelope that comes with the corrugated cards from Michael's. Again, I used Craftsupplies1 goodies, and decorated the outside of the envelope. I toke a piece of paper from the paper line that look like a frame and stamped Thank You on it and also added a tab from my Tim Holtz die, Tags and Tabs. 

Craftsupplies1 is also having a 25% off everything sale right now while the hop is going on and will end Aug 10th....
Here are the links to both stores:


I hope you like my projects and will come join the fun over on YouTube! 
Here is my video that's on my YouTube channel and it also has all the info for the hop and the details on the projects above...see you there!!


Thanks for stopping by!!! Comments are always appreciated and welcomed!! :)


Thursday, July 31, 2014

Shabby Hot Air Balloon

Hello everyone!!

I just want to share with you guys another hot air balloon that I made for a DT Project for Craftsupplies1. I have made a couple of these pretties before and I even have a tutorial on how I make them...I will post at the end :) So here is a pic of the full view of the balloon....


I tried to shabby it up quite a bit...I think I succeeded and I am getting better at the shabby chic look..yay! Anyways....I used flowers, trims, and of course doilies, and the new flower applique Julie is carrying in her shop...must check them out! Just click on the Craftsupplies1 name.

Here is a pic of the top of the balloon...


Here another pic of the very tippy top..lol....


The flowers..like I mentioned are from Craftsupplies1....the little berries are from my friend Marla Rizzo and the wood embellies are from Prima..yes there is a wood hot air balloon and a clock tucked in there..lol! In the video that will be posted at the end you will be able to see where I tucked in the flower applique. 

Here is the pic of the basket...


Inside the basket is a handmade flower that I made using doilies from the store. I love how this one turned out and I hope the person that it's going to will love it too!


As promised here is my tutorial on how I make my hot air balloons:


And here is my YouTube video with all the details on what I used on the balloon pictured above:


Thanks for stopping by!!! I always love and appreciate comments!! :) 


Friday, July 25, 2014

My Shabby Chic Card

Hello everyone!

Today I am sharing my DT project for Craftsupplies1. I decided to do a Shabby Chic card with a hot-air balloon. If you follow me on YouTube then you know how much I love to make hot-air balloons..lol! I am actually making another hot-air balloon to go with it, I just haven't finished it yet. I used some yummy flowers from Craftsupplies1 and some new appliques that are in Julie's shop, but surprisingly I didn't use any lace....imagine that! 

So are ready for some pics...I really don't have that many today...


Here it is!! A full view pic..lol! I used a corrugated card from Recollections you can get them at Michael's. The paper I used is Prima Delight and I also used the chipboard pieces from the collection as well. I made the hot-air balloon by cutting out a silloute from an online clip-art. I think I cut about 10 of them and then folded them in half and glued them back to back. 

See pic below...


This is somewhat of a close-up of the hot-air ballon. I used some lace from Craftsupplies1 and also a butterfly filligree...so cute!!


Here is a close-up of a couple of the chipboard pieces from the Delight collection. Here you can also see pieces of the applique that I used too. 


Here is a close-up of the flower cluster I did. There is some flower bead caps that I used from Craftsupplies1 and also the beautiful applique that is underneath. 


Here is another close-up of the flowers and the cute little butterfly that Becky Long sent to me. :)


This is a pic of the whole bottom of the card...I really love how it turned out! 


Oh and we can't forget about the inside...This is what I did. I just put some background paper down with this plaque that I stamped with the quote. I also added a flower from the applique and some half-back pearls and some Prima Say it in Crystals. Love the tiny flowers...too cute!!! 


And as always....here is my YouTube video with all the details....


Thanks for stopping by and I always love comments :) 


Friday, July 18, 2014

Bottle Cap Charms & Altered Bag

Hello everyone!!

I wanted to do another quick share with you guys today. It's my DT Project for Craftsupplies1. I altered some bottle caps so I could use the new charms Julie is carrying in her shop. They are so cute and I am totally in love with all of them, and plus I am now a little addicted to making bottle cap charms from doing the candy drawer swap with Becky Long...hehehe! I also altered a small canvas bag to hold these little charms and I think it turned out so adorable....more than I expected :)

Here is the picture of them both together:


I made a simple tag for them to be displayed on using the Prima Fairy Rhymes Paper.


Here is the bag by itself. I used a ton of laces from Craftsupplies1 and I have all the details on how I did in the video posted below. I used a doily and some Heidi Swap trim to make the flower with a doily in the center and some flower mesh bling and half back pearl from Craftsupplies1. 


Here are some close-ups of the charms. As you can see there is a ton from Craftsupplies1. Head on over and check out her store...all you have to do is click on the name and it will take you to her Etsy shop. 

Last but not least here is my video that is over on my YouTube Channel
Check it out:


Thanks for stopping by and looking!!! Comments are always appreciated and welcomed :)